I was browsing the wayback machine and thought I’d post a screenshot of our page back in December 2004. Back when we all had more time for playing around with game servers and fun 🙂

I was browsing the wayback machine and thought I’d post a screenshot of our page back in December 2004. Back when we all had more time for playing around with game servers and fun 🙂
It’s been 10 years or so since I’ve posted anything meaningful to the si-ka.net network so I decided to it might be nice to start cross posting some of my technical or interesting topics from my personal blog here. Original.
I thought I’d do a quick write-up covering WiFi SSIDs on multiple VLANs, something that might be useful in a home setup, separating SSIDs better from one another. While I usually prefer the CLI, a lot of the devices mentioned here only (or mainly) use a web GUI for configuration management, so this posting will include a lot more screenshots than my usual postings. This posting won’t contain anything exciting for people who run and support networks professionally (mostly just a “so what options are available on SOHO hardware?”), and may even be overly simple and assume settings you wouldn’t do in a professional setup. But it is useful for homelab enthusiasts looking to build a more complex setup than “everything on the same VLAN/network” or trying to figure out “how do I use VLANs, give me an example”.
Ubiquiti and Netgear have some reasonable priced network gear that I’ve written about in the past that behave decent in home networks. For out little setup today we will have a WiFi access point with multiple SSIDs, two switches, and a firewall/router. We will be focusing on the configuration of the WiFi Access Point (UniFi AP) , the two Netgear switches (GS105Ev2 / GS108Ev3) and the Ubiquiti Router (Edgerouter X).
Our goal is to have two SSIDs on the access point, one for the “normal” devices (VLAN 1), and one for separate devices (VLAN 178). Since the router to VLAN 178 is on a different switch than the access point we also need to trunk both VLANs across the network. Another way of looking at it, is that we are expanding Subnet/VLAN 178 into our network (but limiting it to the WiFi Access points). 178 doesn’t hold any special meaning, you can use any VLAN number you want, just chose 178 because the subnet in this test setup was 10.0.178.0/24.
Here is a diagram of our test setup:

VLAN 1: The management and main client VLAN
VLAN 178: Subnet 178, 2nd WiFi network
Netgear 1
Port 1: Connection to Netgear 2
Port 5: Access Point
Netgear 2
Port 1: Connection to Netgear 1
Port 8: Edgerouter
Edgerouter
eth0: Connection to Subnet 178
eth1: Connection to Netgear 2
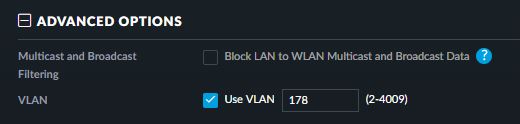
In the UniFi controller go to Settings->Wireless Networks either create a new network or edit an existing one. If you go into the advanced options area, you will find the VLAN setting for that SSID. Activating the option and setting a value means the access point will tag all packets from that SSID to the specified VLAN number.
In the network overview below we see that packets from one network are tagged with VLAN 178, and packets from the other network are untagged (the switch configuration will take care of deciding which VLAN untagged packets are part of).

The Netgear devices only have a VLAN 1 defined by default, so the first step will be to add VLAN 178 to both of them. Enable Advanced 802.1q (VLAN->802.1Q->Advanced->VLAN Configuration), enter the VLAN ID 178 in the box and click on “Add” at the top.

Now let’s move on to the VLAN Membership configuration. To switch settings, just click on the port and it will switch from tagged->untagged->none.
Netgear 1 device
For VLAN 1 we want port 1 to be (T)agged since it is the trunk to the next switch, and all other ports (U)ntagged since they will be dealing with untagged VLAN 1 traffic. The PVID will also be set to 1 for all ports.
For VLAN 178 we want port 1 to be (T)agged since it is the trunk to the next switch, port 5 (T)agged since it is the connection to the access point, and all other ports “none” since none of those ports are part of VLAN 178.


VLAN overview after changing all the settings:

For this scenario it is sane to leave the Port PVID configuration to PVID 1 on all ports. You could change a port to 178 if you are expecting untagged traffic on that port that needs to be in VLAN 178.
Netgear 2 device
Similar configuration as the first switch so I’ll skip the screenshots. Port 1 is the connection to the Netgear 1 device, port 8 is connected to the Edgerouter.
Make sure the interface switch0 spans all ports you want to use VLANs on. Add the two VLANs 1 and 178. They should show up in the list as switch0.1 and switch0.178, and you can apply firewall rules to these interfaces to restrict traffic if you are doing any routing between the two networks.
We will want to tag everything from Subnet 178 as VLAN 178 on the interface connected to that network (eth0 in our setup), and allow VLAN 178 on the outgoing interface (eth1 in our setup). The Edgerouter doesn’t need us to specifically allow VLANs already set by the PVID, only additional VLANs need to be specified in the vid field.

You could put servers or virtual machines in their own subnet/VLAN and then use a firewall to restrict access between the different networks.
Adding more Access Points is straightforward, UniFi automatically applies the wireless configuration to all Access Points it manages, so all you need to do is take care of the switch port configuration.
Soon new laws will go into effect in the EU regarding data privacy. I assume anyone reading this has already noticed everyone updating their privacy policies. The German version of the laws exempt private websites, but the exact definition of what “private” means is a bit unclear.
To err on the side of caution we also updated our privacy policy, our impressum, and took the necessary steps behind the scenes to be complaint with the laws. The following links/forms are also in the policy itself, but for easier access:
[gdpr_preferences text=”Privacy Preferences”]
[gdpr_request_form type=”export-data”]
[gdpr_request_form type=”delete”]
Submit a request to rectify data:
[gdpr_request_form type=”rectify”]
Since I had to fiddle with the settings at the router here is what finally worked for me:
RFC 2516 PPPoE
Multiplexing: LLC
QoS Type: UBR
PCR: default (4000)
SCR: default (4000)
VPI: 1
VCI: 32
DSL Modulation: ADSL2+
Username: 1und1/xxxx-yyy@online.de
Password: [your password]
Note: This works for ADSL based connections. VDSL is a different topic.
We have three Cisco 4410n (WAP4410N-E V02 to be precise) access points delivering wireless lan in our offices. All of them serve the same SSID on different channels. This way we don’t need a roaming controller and have a cheap, simple setup. This worked quite well in the past months. But now and then two of the three boxes stop working for no apparent reason. They can’t be reached over the wired interface and they don’t accept any clients (though connected clients still seem to work).
Using a syslog daemon I found many many of the following two lines:
User.Info host3 Apr 10 17:28:25 host3 syslog: Found beacon stuck, down and up the VAP interface.According to sources on the internet these messages are related to the problem.
Local0.Info host3 Apr 10 17:28:22 host3 kernel: ath_bstuck_tasklet: stuck beacon; resetting (bmiss count 36)
All access points are alreay up-to-date regarding the firmware release (2.0.6.1). Obviously Cisco doesn’t put any more efforts into a new firmware for this product.
I started experimenting with different settings. Some sources suggest increasing the beacon interval time. But this didn’t change anything. Then I compared the settings between the three boxes: all settings are the same besides the wifi channel. So I changed the channels and suddenly the error messages on the syslogd disappeared. As it turned out the errors start as soon as I configure an ap for wifi channel 9 or higher. I don’t understand how a different frequency makes a difference on things like dma and interrupts. So, lets see how things turn out in the next few days.
Really? Lets see …
How many lines of code do you need for opening a file and read its content? Here is an example in Motorola 68000 Assembler and AmigaOS.
Load_Files:
; lock the file
	move.l	dosbase,a6
	lea		gfxfile_fn,a0					; filename c-string
	move.l	a0,d1
	move.l	#ACCESS_READ,d2
	jsr		_LVOLock(a6)					; get lock to our file
	tst.l	d0
	beq.b	.error
; get a fileinfoblock of it
	move.l	d0,gfxfile_lock					; save for later use
	move.l	d0,d1
	lea		myFib,a0						; ptr to our FileInfoBlock
	move.l	a0,d2
	jsr		_LVOExamine(a6)
; release the lock
	move.l	gfxfile_lock,d1
	jsr		_LVOUnLock(a6)					; unlock it
; allocate memory (chipmem in this case)
	lea		myFib,a0
	move.l	fib_Size(a0),gfxfile_size		; size of file in bytes
	move.l	fib_Size(a0),d0
	move.l	#MEMF_CHIP|MEMF_CLEAR,d1		; cleared chipmem
	jsr		myAllocMem
	move.l	d0,gfx_mem
; open file
	lea		gfxfile_fn,a0					; filename c-string
	move.l	a0,d1
	move.l	#MODE_OLDFILE,d2
	jsr		_LVOOpen(a6)
	move.l	d0,gfxfile_handle
; read file in to memory
	move.l	d0,d1
	move.l	gfx_mem,d2
	move.l	gfxfile_size,d3
	jsr		_LVORead(a6)
; close the file
	move.l	gfxfile_handle,d1
	jsr		_LVOClose(a6)
.error:
	rts
Really! I’m fed up with it. Moved my domain’s mail hosting to google apps. Google knows better how to handle spam and it saves me much time.
So, it makes no difference if you drop me a letter at my gmail address or my address at hypnotix.de : google will read it anyway 😀
I bought myself this little gem from komputer.de but was, as many others, puzzled by the errors compiling the LCD12864RSPI example.
D:\dev\arduino-1.0\libraries\LCD12864RSPI\LCD12864RSPI.cpp:10:21: error: wiring.h: No such file or directory
D:\dev\arduino-1.0\libraries\LCD12864RSPI\LCD12864RSPI.cpp: In member function ‘void LCD12864RSPI::delayns()’:
D:\dev\arduino-1.0\libraries\LCD12864RSPI\LCD12864RSPI.cpp:28: error: ‘delayMicroseconds’ was not declared in this scope
D:\dev\arduino-1.0\libraries\LCD12864RSPI\LCD12864RSPI.cpp: In member function ‘void LCD12864RSPI::WriteByte(int)’:
D:\dev\arduino-1.0\libraries\LCD12864RSPI\LCD12864RSPI.cpp:34: error: ‘HIGH’ was not declared in this scope…
Looking into the changelog revealed that all the fundamental definitions of the Arduino enviroment (like HIGH/LOW constants or functions like ‘delayMicroseconds’) are put into a new file called ‘arduino.h’. This file had a different name in earlier revisions.
The solution is simple : navigate to the ‘\arduino-1.0\libraries\LCD12864RSPI‘ folder and replace from ‘LCD12864RSPI.h‘ the inclusion of ‘#include <wiring.h>‘ with ‘#include <arduino.h>‘ and you’re set.
Da glaubt man wirklich man hätte schon vieles im Netz gesehen und wird aber immer noch überrascht (bin wohl doch zu naiv). Die Geschichte in Kürze : Mein Kollege im Nachbarbüro befasst sich derzeit mit nginx als Webserver für manche unserer Anwendungen. Kurzerhand hat er sich vor ein paar Tagen ein Buch zum Thema ‘nginx‘ vom “betascript publishing verlag” über Amazon gekauft (möchte das Ranking der Amazon-Seite nicht noch steigern indem ich hier einen Link darauf setze).
Was da als gedrucktes Buch im Format 226mm x 152mm geliefert wurde ist mehr als nur eine Frechheit. Das gesamte Buch besteht aus Inhalten von Wikipedia-Artikeln zu den verschiedensten Themen. nginx ist nicht mal Ansatzweise Fokus in diesem Buch. Der Umfang des Buches reicht von Artikeln der Geschichte von Microsoft Windows und MacOS bis hin zu Artikeln über die Frage ob die Dateiendung M4A der Dateiendung MP4 vorzuzuiehen sei. Zwischendrin geht es munter weiter mit seitenlangen (!) Referenzen zu Wikipedia-Artikeln. Die Sinnhaftigkeit solcher URL-Wüsten in einem Buch kann wohl jeder selber abschätzen. Als wir der Sache etwas auf den Grund gegangen sind haben wir festgestellt das dies ein (in vielerlei Hinsicht) großes Thema ist.
Offenbar existieren hier “Verlage” welche diesen Vorgang (zusammenkopieren von Wikipedia-Artikeln bis hin zur Veröffentlichung) zumindest teilweise automatisiert haben und über große Buch-Plattformen wie Amazon (aber auch andere wie Barnes&Noble) solchen Müll im großen Stil anbieten. Eine Suche bei Amazon über alle Veröffentlichungen dieses Verlages, heute im Januar 2012, ergab genau 155.428 englischsprachige Bücher. Auch ist der Output einzelner Autoren gigantisch, wie z.B. “Lambert M. Surhone”, welcher allein bei 17.638 Büchern als Autor vermerkt ist. book-spam at its best!
Zugegeben: das Thema Rechte-Vererbungen unter NTFS ist nicht gerade prickelnd, aber trotzdem ist dies kein Grund es nicht korrekt einzusetzen. Leider bringen manche selbsterkorenen IT-Pro’s recht wenig Wissen in diesem (eigentlich recht wichtigem) Thema mit.
 Bei meinem derzeitigen Arbeitgeber hatte ich das Problem das in praktisch der gesamten Dateiablage (aka Fileserver) die Vererbung unterbrochen wurde. Das entsteht entweder beim Verschieben von Daten (im Gegensatz zum Kopieren) oder aber beim Einrichten von NTFS Rechten wo entsprechende Rückfrage pauschal mit “Ja” beantwortet wird (Abbildung rechts).
Falls dieser Dialog mit “Kopieren” beantwortet wird, ist für diese Ebene (sprich Ordner) die NTFS Vererbung dauerhaft unterbrochen. Egal was weiter höher im Dateisystem als Vererbung eingerichtet wird, es endet hier. Darüber hinaus wurden die bisher vererbten Rechte nun als “lokale” Recht eingetragen. Wenn die “Administratoren”-Gruppe vorher per Vererbung berechtigt war (und auch nur beim Ursprung der Vererbung entfernt werden konnte), ist sie nun quasi “lokal” auf dem Ordner/Datei in der ACL eingetragen.
Das Ergebnis ist in der Produktion eher kontra-produktiv. Im nachhinein “mal eben” Rechte bequem von “oben runter” durchreichen funktioniert nicht mehr. In so einer Hierarchie muss jeder Ordner für sich mit Rechten versehen werden. Kurzum : bei großem Umfang ist das kaum noch zu stemmen
Die Korrektur gestaltet sich mittels der GUI relativ einfach : den Haken setzen und schon ist die Vererbung für diesen Ordner wieder aktiv. Problem : nun hat man u.U. manche Gruppen doppelt. Die oben schon besagte “Administratoren”-Gruppe ist nun zweimal berechtigt. Einmal durch die Vererbung und einmal durch die “lokalen” Rechte. Also muss die lokale Berechtigung entfernt werden. An dieser Stelle (aber nicht nur) kommt bei mir ICACLS.exe ins Spiel. Mittels ICACLS.exe können unter Windows XP/Windows Server 2003 (ab SP2) aber auch Windows 7 oder Windows Server 2008 NTFS Rechte auf der Konsole bearbeitet werden. Darüber hinaus finde ich die Darstellung von Rechten auf der Konsole für solche Aufgaben weitaus effektiver als das herum-geklicke in der GUI. Hier ein Beispiel :
NTFS_TEST
VORDEFINIERT\Administratoren:(OI)(CI)(F)
VORDEFINIERT\Benutzer:(CI)(S,WD,AD)
VORDEFINIERT\Benutzer:(OI)(CI)(RX)
ERSTELLER-BESITZER:(OI)(CI)(IO)(F)
NT-AUTORITÄT\SYSTEM:(OI)(CI)(F)
VORDEFINIERT\Administratoren:(I)(OI)(CI)(F)
NT-AUTORITÄT\SYSTEM:(I)(OI)(CI)(F)
ERSTELLER-BESITZER:(I)(OI)(CI)(IO)(F)
VORDEFINIERT\Benutzer:(I)(OI)(CI)(RX)
VORDEFINIERT\Benutzer:(I)(CI)(AD)
VORDEFINIERT\Benutzer:(I)(CI)(WD)
In der ersten Zeile wird der Name des Ordners oder der Datei angezeigt. Darunter stehen zeilenweise die einzelnen Berechtigungen. Zu Beginn jeweils die Gruppe oder der Benutzer und dahinter (nach dem Doppelpunkt) die exakte Berechtigung. In Klammer jeweils die Eigenschaften dieser Berechtigung. (OI) bedeutet diese Berechtigung wir auf alle Dateien unterhalb dieses Ordners vererbt (Object Inheritance). (CI) steht hierbei für die Vererbung auf Unterordner (Container-Inheritance). Am Ende der Zeile steht die Berechtigung an sich. Zum Beispiel (F) für “Full control” oder “M” für “Modify” (Ändern-Recht). Spannend ist hierbei das (I) hinter der Gruppe : diese Berechtigung steht für ein vererbtes Recht (inherited). So ist in unserem Beispiel deutlich zu sehen das die Berechtigungen doppelt vorhanden sind. Einmal lokal und einmal durch die Vererbung aus einem übergeordnetem Ordner.
Mittels ICACLS lassen sich nun recht einfach die Berechtigungen entfernen mit
ICACLS.exe <Ordner/Datei> /remove <Gruppe/Benutzer>
oder um bei unserem Beispiel zu bleiben :
ICACLS.exe NTFS_TEST /remove VORDEFINIERT\Administratoren
Da vererbte Rechte nur am Ursprung entfernt werden können wird somit automatisch die “lokale” Berechtigung entfernt. Das Ergebnis danach (Darstellung mit “ICACLS.exe NTFS_TEST”)
NTFS_TEST
VORDEFINIERT\Benutzer:(CI)(S,WD,AD)
VORDEFINIERT\Benutzer:(OI)(CI)(RX)
ERSTELLER-BESITZER:(OI)(CI)(IO)(F)
NT-AUTORITÄT\SYSTEM:(OI)(CI)(F)
VORDEFINIERT\Administratoren:(I)(OI)(CI)(F)
NT-AUTORITÄT\SYSTEM:(I)(OI)(CI)(F)
ERSTELLER-BESITZER:(I)(OI)(CI)(IO)(F)
VORDEFINIERT\Benutzer:(I)(OI)(CI)(RX)
VORDEFINIERT\Benutzer:(I)(CI)(AD)
VORDEFINIERT\Benutzer:(I)(CI)(WD)
Zu guter letzt (und der eigentliche Grund für dieses Posting). Mit der ICACLS.exe von Windows Server 2003 (SP2) lässt sich die Vererbung leider nicht aktivieren. Die Version von Server 2008 unterstützt den Parameter “/inheritance:[e|d]”. Zum existiert eine aktuellere Version auch für Win2K3. Das ist ein Request-Hotfix und ist hier zu finden.